 Nikon Electronic Format or NEF for short is Nikon’s RAW image format. Referred to as the digital negatives, these raw files contain all the image information along with image’s metadata in form of camera identification, it’s settings, EXIF data, lens used and other information. Check out our article on RAW image format. As a RAW format, NEF files allow you to take care and change most of the camera settings in the post-processing phase. The choice to shoot in RAW has given digital photographers the freedom to focus on photographing than to worry about white-balance, sharpness, colors, saturation in-camera and the likes. Really the only thing you cannot control in the post-processing phase is the light so given that you have taken care of the aperture, shutter speed, ISO, perspective and composition, all the rest can be adjusted when you work with the RAW file. While the RAW files have their merits, let’s check out what Nikon NEF is all about and how to make the most of it.
What is Nikon NEF
Just like any other RAW file, Nikon NEF is the data file which preserves the image information as collected by the camera sensor. The camera records the light reaching to the sensor in form of raw data, stores in-camera settings as metadata and saves it as an NEF file. If you chose to shoot JPEG, then in the process of conversion, the raw data is converted and compressed to result in 8-bit JPGs and the raw data used to process the image is embedded in the EXIF. But when shooting in RAW, Nikon NEF format preserves the raw data as a 12 bit / 14 bit information (depending on your camera features) in a lossy/loss-less/uncompressed/compressed form This data is not the image, just the RAW capture. To see the image you need a RAW converter which can read the NEF files and convert / show them as images.
Thus without a RAW converter, a RAW file is pretty much useless. The RAW file retains the in-camera settings for white-balance, sharpness, hues, etc. along with the captured image. The RAW files are thus rightly referred to as digital “negatives”, which can be processed and developed by the photographer as per the requirements.

The trouble starts once you realize that NEF is a proprietary format. This means it’s Nikons secret RAW format. And thus others don’t exactly know how to read the NEF RAW format — it’s a guess-work at it’s best. There are so many RAW converters available in the market which have support for the Nikon NEF RAW format. However the truth is that their conversion process tries to guess the image levels, curves, saturation, color-representation. These RAW converters have come to do a pretty impressive job in recent times, however there’s nothing that beats Nikon’s own RAW converter. After all who else understands the NEF format better than the creators? But the Nikon RAW converter Capture NX comes for a price.
And easy way to see a proof of the imperfection of these software is to shoot in NEF + JPG mode and then open the NEF in any third-party software and compare with the JPG. The in-camera converted JPGs will be more accurate and consistent. This difference is especially pronounced if you overexpose or underexpose the shot — just makes it extra tricky for the third-party software to render the curves and the colors.
I like the results better in X software — this statement is not an argument for or against the performance of any RAW converter. It’s rather a matter of personal preference.
The trickier the lighting, the poorer the results from third-party RAW converters. As you work with NEFs shot under tricky lighting you’ll realize that nothing works for these NEFs like Nikons own.
Getting Accurate Colors & Exposure From NEFs Without A NEF Converter
Wait, you don’t really have to pay to get the accurate results. You can just shoot in JPG format an the camera has all this stuff built-in to convert RAW into JPGs and save them. One major drawback — this shortcut trick devoids you of the NEF file as it is discarded after the conversion to JPG is done. Also you’ll not have as much flexibility with JPGs as you’d have with the RAW files.
View NX is a free software from Nikon which allows you to view the NEF files. But it’s not meant for post-processing and does not give you the ability to make adjustments to the critical NEF parameters. But it better that JPG as you can use View NX to save files into a lossless format, get accurate image and do the rest in your favorite image editor.
Proprietary Nikon RAW Converter
There are a number of RAW converters available to read and convert the RAW files. RAWConverter, Adobe Camera RAW (Photoshop plugin), Bibble, Phase One are a few to name. But when working with Nikon’s RAW format, Nikon’s proprietary RAW converter is the only one that brings out the actual image with all it’s precise curves and color-accuracy. Nikon offers Capture NX2 and View NX2 (latest versions) to make the most of Nikon’s digital imagery. These RAW converters apply a demosaicing algorithm to reconstruct the images from the raw data collected by the camera-sensor, as used by the camera to process the images in-camera. This results in rendering accurate details and color to the image.
- ViewNX: ViewNX is a free software from Nikon. It allows you to view, edit and convert the raw files to .jpeg or .tiff. You can also make minor adjustments like correcting the white balance or play around with exposure compensation. Whilst for the full-fledged and powerful image editing features, look for its sibling Capture NX.
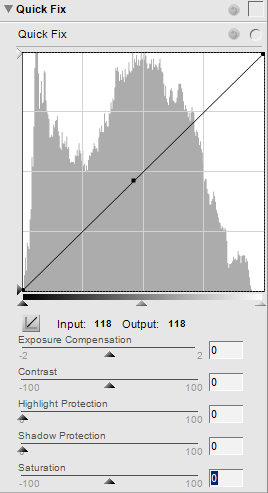
- Capture NX: Capture NX2 is the latest (and paid) version of the full-featured, powerful NEF image editing solution offered by Nikon. It greatly simplifies working with RAW files and offers features like color control points, auto retouch brush and a quick fix section to play around with level and tone curves, exposure compensation, contrast, highlight and shadow protection and saturation in a single window.

Why Prefer Capture NX Over Others
Even though there are a number of options for a Nikonist, Capture NX scores over all the others. Check out this article on RAW Converter Comparison (for Nikon based DSLRs) by Thom Hogan to know why Capture NX is the best fit for Nikon NEFs. Note that it is an old article and compares the old version of Capture NX, the current offering by Nikon is Capture NX2. Capture NX2 also has a unique way of applying adjustments to complex selections quickly and easily which it done with control points — makes adjustments a snap.
Quick Tips To Make The Most Of Nikon NEFs
- The first one goes without a toss. Using Nikon’s proprietary RAW converter results in high quality images with consistency, accurate curves and colors and everything. This is so because non-Nikon software’s decoding of NEF is a guess-work at it’s best. For example, when you set your Nikon camera to shoot black and white in RAW format, it will still save a color photo, but flagging it as a black and white. Nikon softwares read this and display the file accurately as black and white. But non-Nikon software fail to decipher this information and thus accept the raw data as a color image.
- Backup the NEFs before engaging yourself in processing and converting the images. Archive the NEFs to re-visit the images to play around with the camera settings in Capture NX2.

- After processing the images save them as .jpg, .tiff or as an NEF again. When you save as NEF you have the ability to save the new settings as a new version in the same NEF without creating a new file.
- Think of NEF files as developing and printing your own negative film. Feel free to use multiple image editors to arrive at the desired result. Start with applying the in-camera settings in Capture NX2, save the result as .tiff and re-open the files in Photoshop to add further finishing touches, like applying warm filter and so on.
- Nikon raw data files gives you an opportunity to correct almost everything except aperture settings, shutter speed and lighting. You can correct white balance, saturation or use exposure compensation controls in Capture NX2 but things like good composition, required DOF and motion capture have to be looked after before releasing the camera-shutter.
You don’t have to shoot in RAW always. But if you intend to invest time and effort to fine-tune the result, NEF is the way to go. Shooting in RAW gives you accurate results and gives you a chance to understand the finer nuances of the camera and image editing possibilities.
What have you been using for your NEFs?


I’ve been using NEFs for a long time – the difference in size to large jpeg’s isn’t worth worrying about, and the flexibility you get from them far offsets the storage requirements.
I found this article very interesting. I’ve been shooting in black and white quite a lot and using lightroom to do the conversion. One of the things I noticed was any photos flagged as B&W showed as black and white initially, then converted to red (due to the red filter I use). After reading what your article, it all makes perfect sense why it’s doing this. The B&W image is just a thumbnail created in the camera for the back-screen, and embedded in the NEF.
The only thing I really don’t like the idea of is using ANOTHER program to convert to tiff, then using lightroom to convert to JPG. You will lose some of the abilities of the format in lightroom, so your tweaking to the settings won’t be as powerful. It’s just a shame that Nikon don’t release this format properly so people like Adobe can adopt it correctly in their software – I’m sure they would be happy to license it from them
Granted – you could just use one of Nikon’s pieces of software – but they don’t give you the same creative control.. Ah well – rock and a hard place I guess =)