Red-eye is mostly encountered in the photographs taken at night with flash on. The direct light from the camera flash reflects off the retina, resulting in the red color (from the blood vessels that nourish the eye). In the course of clicking pics of your loved ones, you may have encountered this effect quite often. It ruins the otherwise perfectly captured portrait. With Photoshop it is really easy to remove this red-eye effect in just a few steps. Here’s the steps:
- Fire up Photoshop and open up the image to which red-eye reduction has to be applied.

- Zoom into the affected area with
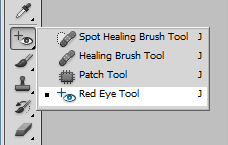
Ctrl++. (Hold down spacebar to get a hand pointer and drag and position the image as required). - Next, select the Red Eye Tool from toolbar. You will find this tool beneath the Spot Healing tool or the Healing Brush tool where you have to left-click and hold the mouse for a few seconds for the fly-out to appear.

- Now all you have to do is use the red-eye tool on the part of the picture you want to apply (eye). Position the mouse pointer over the affected area and click once. The tool corrects the red part of the eye.

- If you are unhappy with the changes you’ve made you can conveniently alter the settings of the tool to get the required results.

- The result will be natural, convincing and save a beautiful photograph.

