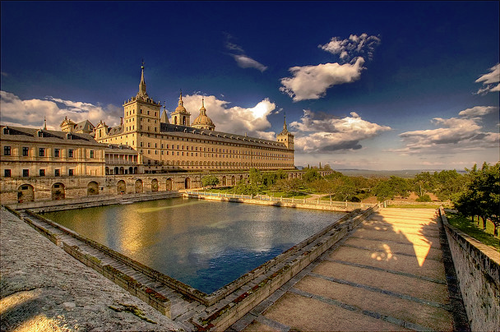
HDR stands for High Dynamic Range. Cameras have a limited ability to capture all the shades of gray or the various brightness levels in the scenes. Don’t confuse brightness with the white color – it’s different in the day and night, indoors and outdoors. When a scene has varied levels of brightness, the camera just fails to capture them on a single exposure level. Depending on the metering mode you use, the camera tends to overexpose or underexpose certain parts of a scene which are beyond it’s limited dynamic range. A good example is a back-lit scene – they always have the subject underexposed (unless using a fill light).

This scene has various levels of brightness which could not have been captured in a single exposure.
HDR photography solves this. It helps you capture and recreate the scene with all the details and colors intact. But how does this work? There are two ways to create HDR images.
-
Creating HDR Images By Bracketing The Shots
In this mode, you use bracketing to take multiple shots and then use an external software to merge these shots at various exposure levels into one. Here’s a quick hands-on.
- Set your camera to shoot in continuous mode with bracketing.
- Find a well illuminated scene featuring various shades or brightness levels a good example objects and shadows.
- Place the camera on a tripod or a stable surface and compose the shot and photograph.
- Transfer these photographs to the computer and open all of these images in Adobe Photoshop under File> Automate > Merge to HDR. You’ll get the box prompting you for the images to be merged. Click on “Add Open Files”. It will then merge these various shots into HDR. Refer the step by step tutorial to create HDR images here.
-
Creating HDR Images By Shooting In RAW
HDR photography is also possible it you shoot in the RAW format . The RAW format (learn more about RAW format here) allows you to vary exposure (amongst other parameters) as a step in post processing. This way you can shoot a single RAW format photograph and create an HDR image.
- Select a good scene as above in (1.a).
- Take a single shot at optical exposure in the camera’s native RAW has the NEF extension while canons use CRW.
- Open this image in a software like Photoshop.
- Vary the exposure to -1 and save as a tif. (Tif or tiff is a lossless image format which keeps the picture properties intact).
- Vary the exposure to +2 and save a second copy as tif.
- Finally open the image at original exposure and save as a tif.
- Open the three images in tif format and merge them into an HDR. (Tip: If you can, buy the imaging softwarefrom the camera manufacturer as softwares cut the entire process short into a single step.
Share your HDR images here.
Photo By: R.Duran

