In our previous article 7 Steps To Preparing Your Photographs For Professional Lab Printing of this series, we went through the steps required for commercial printing. In this article we will focus on printing lab quality photographs at home. While relying on the printing labs and ordering the prints online is a viable option for bulk-printing (and enlargements), printing at home is convenient and feasible option most of the times. After all you don’t need to wait for the final prints, you get the flexibility of fine-tuning your results too. It’s just the matter of tweaking the print settings and a push of the Print button which can get you lab quality prints at home. Here’s a step-by-step guide to make it easier for you to print high quality images at home.
Choosing The Right Printer
In the printing workflow, choosing the right equipment and material goes a long way in getting the right quality of prints. Inkjet printers are commonly used for home printing. Canon, Epson, HP have lined up a series of inkjet printers to offer high quality color as well as black and white prints. Canon’s Pixma, HP’s Photosmart and Epson’s WorkForce are a few to name. The inkjet printers use multiple cartridges which release ink onto the paper through little jets to achieve smooth and photo-realistic tonal gradations. The inkjet printers are affordable and an appropriate solution for printing images at home. You need to consider the following points when planning to buy a printer for printing fine quality images at home.
- Resolution: Printer resolution is measured in terms of dpi (dots per inch). And just like a higher pixel density enhances the quality of the photograph, the printer with higher dpi settings can produce more detailed photographic prints.
- Ink Cartridges: A printer with separate cartridges for each color produces better color prints. If you are an avid photographer and love to print at home, investing in a photo-printer with 6 colors is a good idea.
- Connectivity And Compatibility: Check if the printer is compatible with your operating system and have a look at the connectivity options offered by the printer. Some printers allow you to directly connect the camera to the printer, some offer wireless connectivity while some of them even come with the memory card slot which allows editing and printing directly from the camera’s memory card.
- Stationary: Excellent quality prints depend a lot on the paper and the ink used by the printer. The printer manufacturers generally offer the paper and ink that are developed specifically to work well together.
- Multiple Functions: Multifunctional inkjet printers are common in market these days. You can easily find a printer which feature color printing with scanning and copying abilities.
Choosing The Printing Paper
Choosing the right type of printing paper greatly helps in obtaining the lab quality prints at home. Different types of printing papers are suitable for different types of photographs. For instance, Matte finish paper is recommended for black and white photos while glossy paper is good to go for color prints. The paper finish is one of the most important factors that contribute to the quality of a print. Check out our article on printing paper types for an overview and utility of various printing papers. Apart from the type of paper, the size of the photo-paper should also be considered. The size of the paper that you choose to print your photographs entirely depend on the image size and the printer’s capability. While 4*6 is the traditional size for most prints, the printers may support 5*7 (for albums) and 8*10 (for framing and display) paper sizes as well. Prefer approaching the color labs for enlarging the photos.
Processing The Photographs For Print
This is the first step in the printing workflow. Choose the image you want to print and add professional touches to the image. Make subtle changes like adjusting the contrast and saturation, correcting the color cast and fine-tuning the sharpness. With respect to sharpening, note that sharpening for web is different from sharpening for prints. As a general perception, sharpen the image for web and then double the amount of sharpness to retain the sharpness in the final print. Refer to the article post processing for printing for more information on the crucial adjustments required for preparing the image for print. After fine-tuning the image, re-size the image and set the resolution manually, else the printer will either crop the image or enlarge the photograph to map it with the printer resolution settings.
Soft Proofing Your Photographs
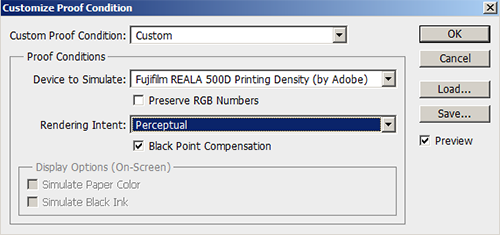
The next step is to proof the colors. Photoshop makes provision for soft-proofing the colors. For this, you will need to download the printer / paper profile for simulating the accurate colors (you can download it from the supplier’s website) and set the proof profile to the printer profile. To set the proof profile,
- Go to View > Proof Setup > Custom.
- Select the downloaded profile from the Device to Simulate drop-down.
- Choose Perceptual from Rendering Intent drop-down. A rendering intent determines how Color Management Module of Photoshop handles the color conversion or color mapping from one color space to another. Perpetual Rendering Intent is suitable for photographic images owing to its ability to preserve the visual relationship between colors.
- Click OK to set the proof profile.

Customizing Proof Settings
This sets the proof profile to the destination device. Now go to View > Proof Colors or press Ctrl+Y to view the colors as will appear in the final print. Use levels, color balance, hue / saturation and other tools until the image looks as you want in the final print.
Print Settings For Great Photographs
This is the final and most critical stage in printing the photographs at home. After you have made the necessary adjustments, to go File > Print or press Ctrl+P to open the print dialog and choose the options — Photoshop print dialog box allows you to preview the print, select the printer, set paper orientation, position and scale image, specify the output options and specify color management and proofing options.
After specifying the basic print settings, select color management from the pop-up menu in the upper right corner and choose Document. This will set the printer profile to the profile set for proof. The color handling drop-down provides two options. You can either set Photoshop to manage the colors or select “Printer Manages Color”. I simply leave it to the printer to manage the colors. It is important to note that
- When you select Photoshop Manages Color, disable printer’s color management
- When you select Printer Manages Color, don’t forget to enable printer’s color management and disable print-color-management in the application.
Ensure that only one of them manages the color; either Photoshop or the printer. If the color management is enabled on both, the final result will be messed up. The last thing to do is to print and wait for a breathtaking output.


Nowadays desktop printers can do a lot, but be careful: they require constant use to work properly.
In my opinion, everyone printing less than 3-5 photos per week should forget about them and just go to a local printing lab. No shipment costs, no waiting (usually), no throwing away cartdridges/print heads almost full that clogged for the insufficient use.